Get More Creative and Design for Business Printing Services
This guide will help ensure that your files are properly saved and formatted before sending them to us. Don't hesitate to contact us if you have any questions!
Submission Checklist
✔ Are your files in PDF format?
✔ Are your fonts embedded or outlined?
✔ Have you added bleeds and crop marks (not required for most sign orders)?
✔ Is your artwork vector (where possible)?
✔ Have transparencies been flattened?
✔ Have files been saved as CMYK?
✔ Are you using the correct CMYK values for black?
Saving as a PDF
PDF is a universal format that ensures your documents look the same on every computer.
Saving a file as a PDF is typically done through either the "Save As" command (Adobe Illustrator, Adobe Photoshop, Microsoft Word) or the "Export" command (Adobe InDesign). Some programs, such as Corell Draw, may have a special "Publish to PDF" (or similar) option.
Embedding and Outlining Fonts
In the vast majority of cases, simply saving your file as a PDF will embed any fonts you have used. However, in some cases, such as when you are using a file format other than PDF, outlining the fonts may be required.
In Adobe Illustrator, you can find the "Create Outlines" option under the "Type" menu. Most programs will have similar options. Please note that converting your type to outlines means that you will no longer be able to edit it.
Adding Bleeds and Crop Marks

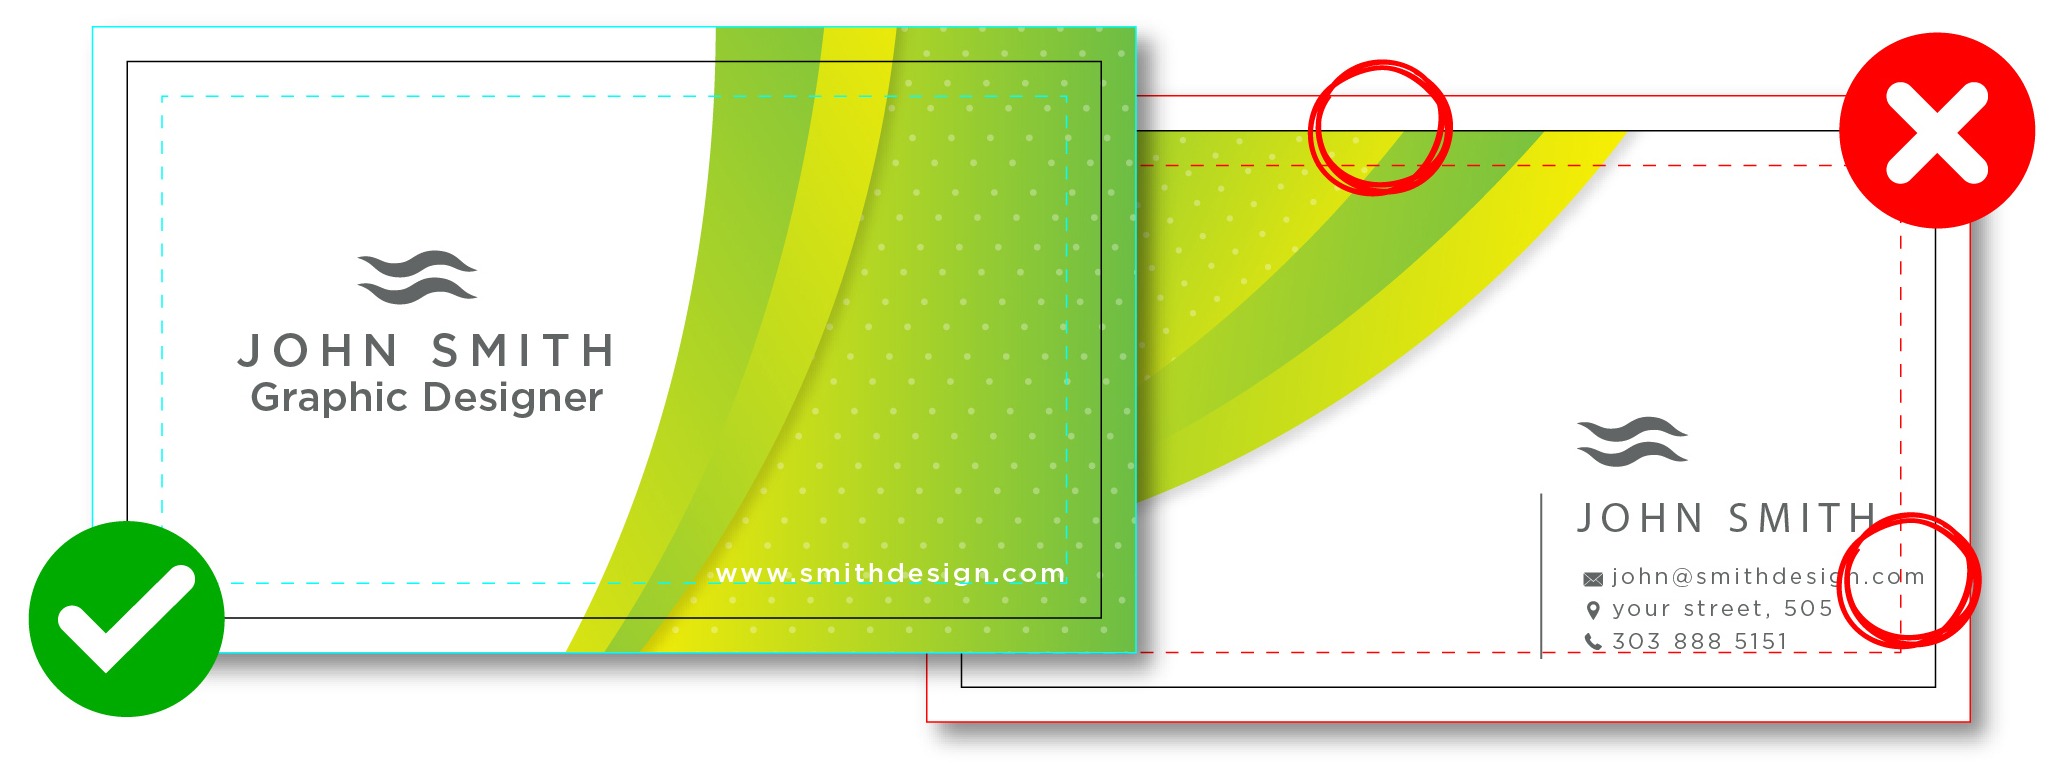
Most machines are unable to print to the edge, as it leaves them nowhere to hold the paper. Because of this, you need to add bleed and crop marks to your image. "Bleed" is image that extends beyond the edge of your finished product. "Crop marks" are lines within the bleed that tell us where to cut.
Adding bleed and crop marks is simple! First, make sure that your artwork extends beyond the borders of your document. Now, when you save your document as a PDF, select the "Marks and Bleeds" section. Check the "Trim Marks" box. If your document does not already have bleeds, uncheck the "Use Document Bleed Settings" box and enter a value of 0.25. Save the PDF, and it will now include crops and bleeds.
Vector Artwork

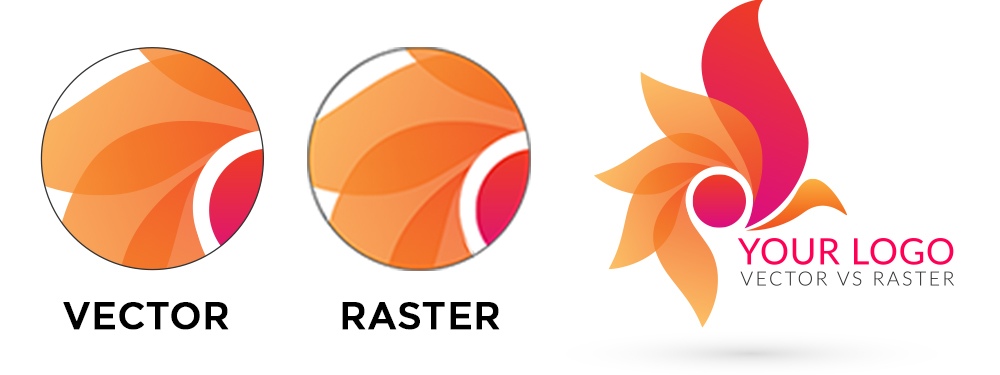
On a computer, there are two basic types of types of artwork: vector and raster.
Raster images are made up of individual pixels, and have a resolution (such as 72 dpi or 300 dpi). Typical examples of raster images include photographs and images created for websites.
Vector images are a stored set of data points, which the computer understands as an image. Vector images are infinitely re-sizeable - they will never appear blurry or choppy when enlarged. Typical examples of raster images include logos, illustrations, and type.
Since vector images can be infinitely enlarged, it is important that you use them wherever possible when designing for print, especially when dealing with large signs and banners. Most company logos are designed in a vector format, so please contact your design department if you're unsure. Vector images will be saved in a vector-compatible format, such as PDF, EPS, or AI. Please note that these formats also support raster images, so having a file saved in these formats does not necessarily mean that it is vector.
Flattening Transparency
To avoid errors in translation from what you see on the screen to what you see as a physical print, transparencies must be flattened. This is essential for any raster images with built-in transparencies (such as Photoshop or PNG files), Illustrator effects like drop shadows, and vector shapes that have any percentage of transparency.
In Adobe Illustrator, Select All (Ctrl-A) and choose "Flatten Transparency..." from the Object menu. Select the "High Resolution" preset and hit ok. Illustrator will most likely divide the image up into a grid; this is normal and is visible only on-screen, not in the physical print. Save your file as a PDF. Most other programs will have similar options.
Saving Files in CMYK Mode
To ensure the colours you see on your screen are as close as possible to your final print, make sure you desgin and save your files in CMYK mode.
You can change your colour mode under File -> Document Colour Mode (Adobe Illustrator) or Image -> Mode (Adobe Photoshop).
Ensuring Black Colours Have the Correct CMYK Value
Often, black objects like text and barcodes will have improper CMYK values, particularly when they have been converted from RBG. This leads to inconsistent prints and wasted ink.
Please ensure that your text and other objects have the correct black values. Select the objects in Adobe Illustrator (or your similar editing program), set the C, M, and Y channels to 0%, and the K channel to 100%.

